
These are the Stix+Stones Originals, they are the first batch of stones made to date 10/31/2014. I will continue to post them in batches as I make them.
Coming soon to Etsy!
In the meantime don’t forget to follow us on social media:
Stix+Stones Facebook, Twitter and Instagram! Or e-mail us with questions or for custom designs at StixAndStonesCLT@iCloud.com
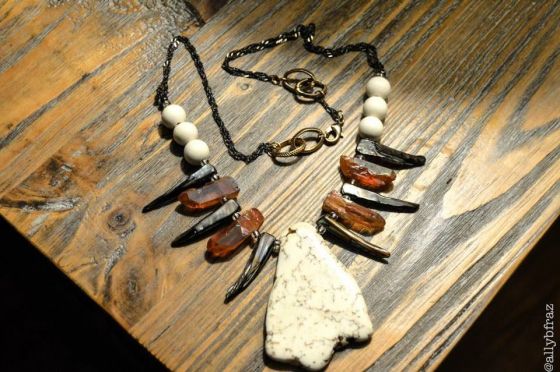
White Turquiose slab | Peach quartz points | Upcycled vintage black agate spikes | Whitewood beads | Gunmetal chain with gold links.

Carmel cut agate stone with gold trim and wire wrapping | Black asymmetrical coconut shells | up cycled gold vintage disks | Suede tan cord.

Phantom Amethyst Purple Quartz Point | Gold wire wire wrapping, by hand | Gold silver circle chain.

Phantom Amethyst Purple Quartz Point | Gold wire wire wrapping, by hand | Gold silver circle chain.

Rainbow Mystic Quartz | Tiny silver beading | Dainty gold chain.
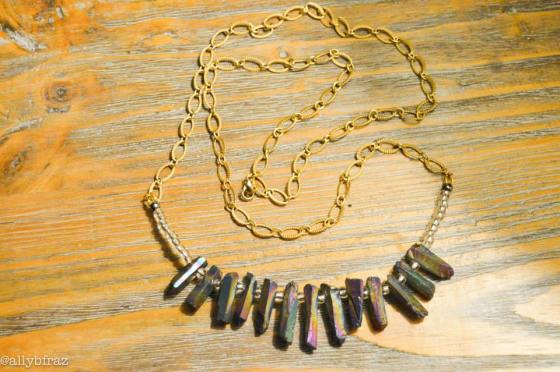
Rainbow Mystic Quartz | Tiny silver beading | Dainty gold chain.

Large Turqouise Agate Slab | Natural Coconut Spikes | Small White Shell Beads | Small Cork Circles | Dark Brown Wooden beads with Design | Copper circle looped cord.

Large Turqouise Agate Slab | Natural Coconut Spikes | Small White Shell Beads | Small Cork Circles | Dark Brown Wooden beads with Design | Copper circle looped cord.

Two-toned Arrowhead and Beading | Freshwater Pearls | Rainbow Mystic Quartz Points | Dainty gold chain.

Sea Urchin Sticks | Black Dyed Coconut Spikes | Slate Grey Druzy beading | Grey Suede cord.
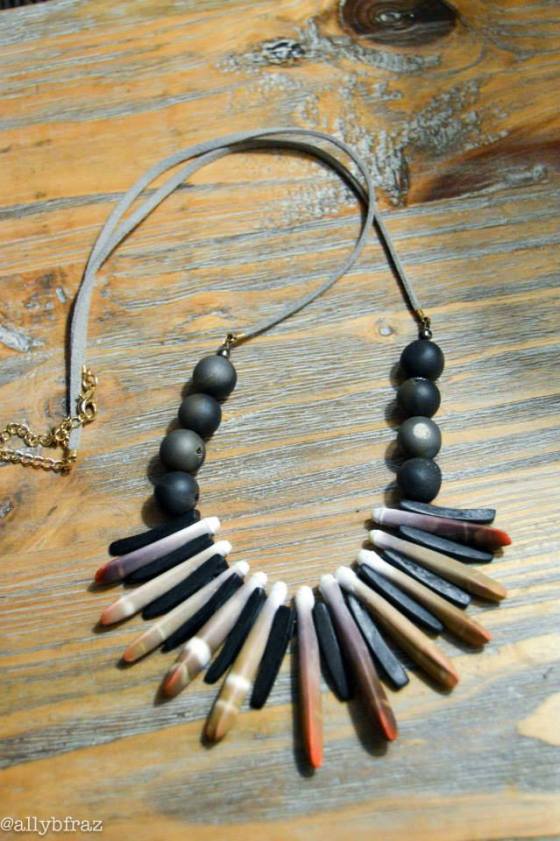
Sea Urchin Sticks | Black Dyed Coconut Spikes | Slate Grey Druzy beading | Grey Suede cord.
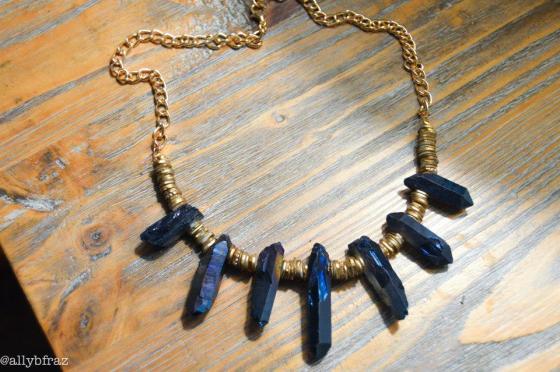
Blue Mystic Quartz Points | Vintage gold disks | Gold chain.

Five Quartz Points | Gold wire wrapping | Upcycled dark brown wooden beads | Vintage wooden disks | Suede tan cord.

Turquiose Multi Druzy Agate Slab | Freshwater Pearls | Slate Grey Druzy beading | Gold wire wrapping | Grey Suede cord.

Turquiose Multi Druzy Agate Slab | Freshwater Pearls | Slate Grey Druzy beading | Gold wire wrapping | Grey Suede cord.

Blue Mystic Quartz Points | Silver mini beads | Whitewood Beads | Suede tan cord.

Blue Mystic Quartz Points | Silver mini beads | Whitewood Beads | Suede tan cord.

Upcycled wooden cylinder | Rainbow Mystic Quartz | Vintage wooden discs | Suede tan cord.

Upcycled wooden cylinder | Rainbow Mystic Quartz | Vintage wooden discs | Suede tan cord.


